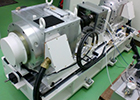
What are surface plates?
Surface plates are generally used as datum surface in the machining, assembly, and inspection of mechanical parts. Surface plates have a surface with a rectangular or square shape, and that surface is finished with a regular flat surface with a machine finish, hand scraped finish, or lapped finish. In recent years, there has been demand for a wide variety of functions for applications such as various tests of vehicles, etc.
Material
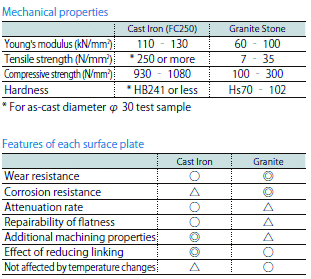
Cast iron and granite are widely used as the material.
- Cast Iron
Gray cast iron is widely used, with reinforcing by ribs on the back surface to reduce deformations.
Internal stress is relieved by heat treatment (annealing) in order to remove secular change after casting.
- Granite
Granite, gabbro, and diabase are used, and offers features such as no rust, and no dents when scratched.
Gabbro (commonly called granite stone) in particular is
mechanically superior because it is very hard and offers low variation with a fine structure.
[Physical properties of granite stone]
・Specific gravity: 2.9
・Water absorption: 0.03%
・Thermal conductivity: 2.14 W/m・k
・Linear expansion coefficient: 5.5 × 10⁻⁶/°C
Accuracy Standards
When performing measuring work on surface plates, the "flatness" of the surface plate has an effect on the reliability of the measured values. The flatness tolerance is categorized into grade 0, grade 1, grade 2, and grade 3 based on the JIS standards, and can be found from the following equation. (JIS B 7513)
- Flatness
This represents the dimension of the minimum gap between the two planes when the used surface is sandwiched between two perfectly geometrically flat planes. (JIS B 7513)
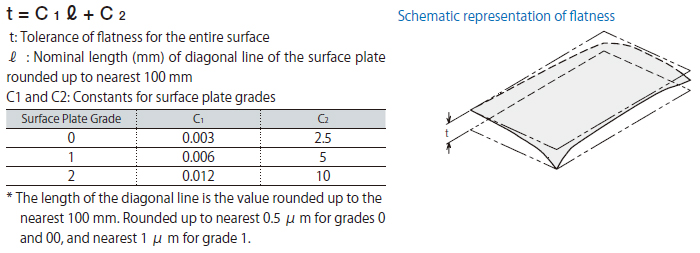
The flatness of each surface plate is based on the JIS standards. Granite surface plates in particular are designated grade 00, which surpasses JIS grade 0.

Used Surface Finish
- Machined Finish
Milled finishes and hale finishes are performed by machining, and both give a finish with the same surface roughness. (Surface roughness 3.2 to 6.3 Ra)
・Milled finish: Cutting performed by rotational motion
・Hale finish: Cutting performed by linear motion
Machining grooves and holes can also be supported by machining tools.
- Hand Scraped Finish
This is a manual process that is performed on a machined surface to obtain an even higher accuracy.
This finish is also used in surface plates and measurement instruments, and ensures a high grade of accuracy.
Hand scraped finish also offers the effect of reducing linking (sealing) with measuring instruments.
Rigidity
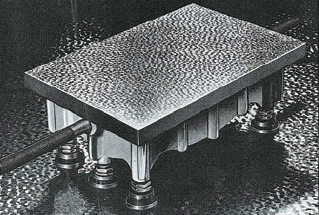
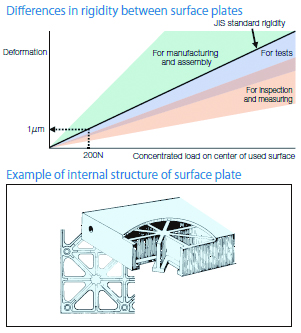
The rigidity of a surface plate is determined by the material and structure. The height, thickness, and arrangement and shape of ribs of surface plates all have an effect on the rigidity. In precision surface plates (JIS B 7513), rigidity is defined as follows. "Having a rigidity such that the deformation of the loaded area does not exceed 1 μm per 200 N when a load is applied to the center of the surface plate used surface" The rigidity of our surface plates and the position of the JIS standard are shown in a rigidity distribution diagram. (The evaluation differs for surface plates for testing)
Maximum Allowable Load
The maximum allowable load is given as a guide when loading on the surface plate. The maximum allowable load for each surface plate is calculated based on the conditions in the following table. Refer to this when loading on the surface plate. For surface plates for testing, the calculation method varies due to multipoint constraints. (Maximum allowable load and endurance load mean the same thing) Please note that the maximum allowable load is not a guarantee of flatness.。

Quality Control
Calibration rules are determined through national standards - inside the company standards - operational measurement instruments. Maintenance and management of measurement instrument accuracy and product quality are guaranteed.
Calibration certificates can be issued upon request. (For a fee)
* Please inquire, as these cannot be issued for some models.
Installation
- Surface Plate for Inspection and Measuring
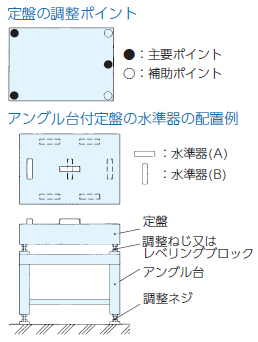
Tilting of surface plate has bad influence on reliability of measured value. When installing it, level adjustment is needed to minimize the tilting. The level is adjusted on main point and support point separetely with screws or levelling blocks.
Main point (●)
Level is adjusted roughly and the loading of surface plate is supported on these points.
Support Point (○)
Level is adjusted finely and distribution of loading is done on these points.

- Surface plates for manufacturing and assembly
Please use sim plates for stable installation, if surface plate is installed on the floor or steel stand. Level adjustment is needed according to the procedure indicated in the above, if the used surface should be flat.

- Surface Plate for testing
In order to install test object and equipment on the surface plate for testing, it should be rigid and become unified with stand. In addition, there is a case to put a few plates side by side. In this case, it's necessary to discuss with customer, constructor and test-equipment manufacture in advance. General installation method is described in the below. The method for level adjustment is same as for inspection.

The others
Surface plate should be placed in the enviroment in which the temperature and humidity are managed. Please do not keep it in direct sunlight. Loading should be distributed as much as you can not to exceed maximum loading.
In case of cast iron surface plates
Scratch on the used surface causes wear. Therefore, it should be removed with grinding stone and clean. Please apply lubricant oil to the used surface and cover it with plastic sheet, if surface plate isn't used for a long time.
Surface plate for testing
Please contact us, if you have any further question about surface plate for testing.
Combination of surface plate for testing and vibration isolation mounts.
We propose you suitable surface plate with vibration isolation mounts for various testing condition.


